In this week’s video with IDJESTER, I answered a question about how to play a shot that goes into the water. Unfortunately, I got it partly wrong. This post is intended to correct that mistake.
There are really two parts to this question: (1) How do you handle a shot that goes into the water in real golf? and (2) How do you get the Game Caddie to do that?
As I said in the video, I’m no expert on USGA or PGA rules, so look elsewhere for “official” guidance on this subject. But bear in mind that APBA doesn’t make any distinctions between red or yellow penalty areas, so you may not find the official rules totally helpful on this matter.
In the video, I mentioned that you have up to three options for where you can drop the ball for your next shot.
- If you have a “drop area,” you would usually hit from there.
- If not, you could re-hit from your original location.
- Or, (and this is what I got wrong) I said you could drop the ball anywhere along a straight line from where the ball was hit and where it ends up.
I believe this is a common mistake many weekend golfers make, so let me correct the record (and try to salvage my tarnished reputation). Let’s go back and look at the hole in question. It was #16 at Magnolia.
In our video example, the 8-iron tee shot on this 170-yard par 3 carried 150 yards L5. Since we have no way of knowing the actual trajectory of the shot, we draw a straight (blue) line from that location back to the tee to determine where the ball first crossed into the hazard. That turns out to be slightly left of the 25-yard mark, as circled in the image below.
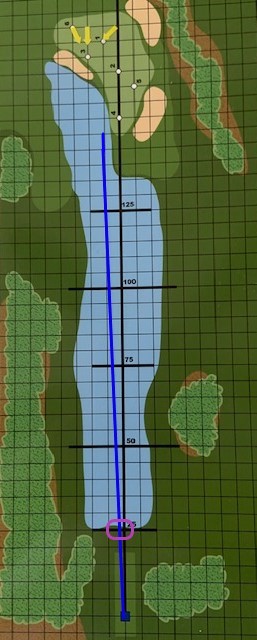
Ignore the yellow arrows. They are there as a reminder of this hole’s course note about balls that land past pin #1.
The next step (which I omitted in the video) is to draw a straight line from the hole to the point where the ball crossed into the hazard. We were using pin location #1, which happens to be on almost the same path from the crossing point as our shot. That path is shown in red in the image below.
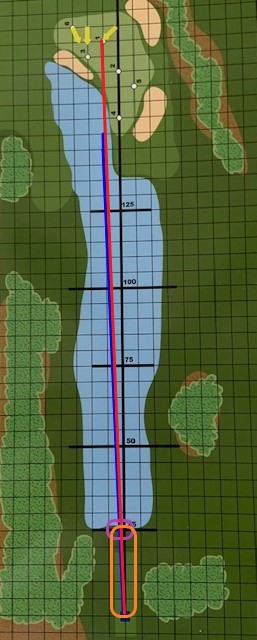
You are permitted to drop the ball anywhere along that (red) path, as long as it’s behind the crossing point. In the image above, that’s the area circled in orange. Although it doesn’t apply in this situation, you can’t drop the ball on the green. As I mentioned in the video, I sometimes make an exception to this when there is nowhere else to drop the ball due to the way the gridlines are positioned.
In the video, I show you how to use the GC to record the original shot, the drop ball location, and the penalty stroke. Here is a quick summary, using the example above.
Step 1:
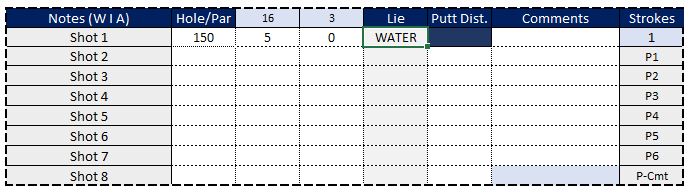
Record the tee shot that went into the water by clicking the Update Arrow. When the Record Location menu appears, select the radio button at the bottom left and type in WATER. Click the Record button to record the shot (and a stroke) in the Notes on the Caddie tab.
Step 2:
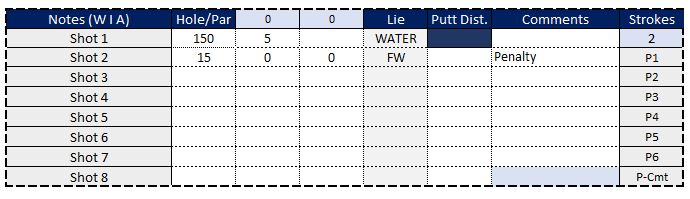
Enter the coordinates where you want to drop the ball into the Place Ball at Location tool. (If you want to re-hit from the tee, you can leave the Ball at Location tool blank.) Click the Place Ball button and record the new lie (and penalty stroke) in the Notes. Optionally, you can write Penalty in the Comments to remind you when it comes time to fill out the Scorecard.
Step 3:
Take your next shot as you normally would.
Final Reminders:
Always remember to enter the shot that goes into the water (or OB) into the Notes. If you are playing with more than one golfer, pay close attention to the Who’s Away? tool so that you don’t get confused as to who’s up. This is particularly true, if more than one shot goes into the water!
You may also get a warning that the GC doesn’t recognize the Lie you have entered (i.e., WATER) as valid. Don’t worry about that. As soon as you record the dropped ball location in the Notes with a recognizable Lie (e.g., FW), everything will be fine.